Intro to Raw Tables
Written by TheGameAce
Most of the files you'll be commonly editing are Datatable files. These files are internally denoted with a "DT" prefix at the start of the file name. Here we'll be going over how to edit those files, excluding Arrays, which will be in a separate guide. This method can also be used to add new entries inside of a DT.
File + Folder Setup
This part is extremely simple. With PalSchema's main folder open in Visual Studio Code, you'll want to look at the explorer on the left-hand side where you should see all of PalSchema's folders and subsequent files. Navigate to "mods", right click, and select "New Folder...". Name this folder whatever you like. I prefer to use the name of the mod I'm creating for the sake of coherence and organization. In this tutorial I'll just call it TestMod.
Once the folder is created, right click it and create a folder called raw inside it. For editing any "raw" datatables, this folder must be named raw.
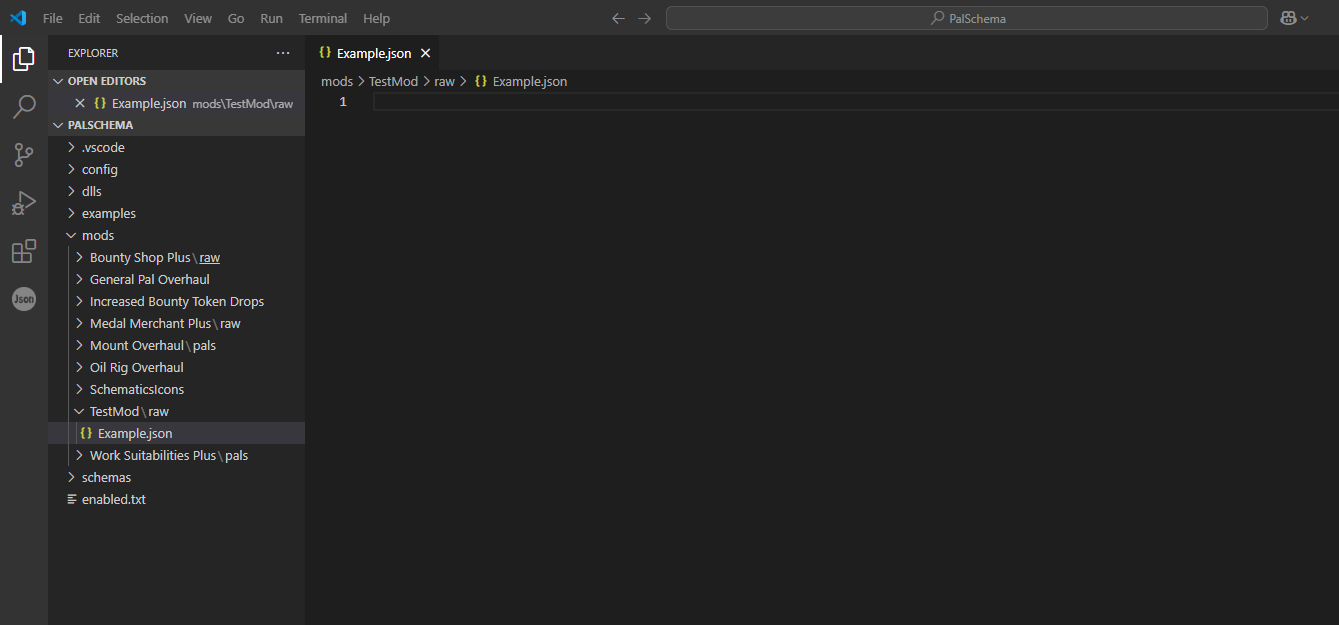
The last step for setup will be setting up the .json file for editing. For this, simply right click the raw folder in explorer, and this time select "New File...". Just like with the mod folder you created, this file can take on any name. Keep in mind that you need to manually input the .json extension at the end of the file name for it to properly take on .json format.
File Formatting
With setup done, we move on to setting up the newly created .json file with proper formatting, and making our first edits. First, open up the .json file if you haven't already. If everything has been handled properly up to this point, things should look about like this (save for names):
Now before we take the next step, pull up FModel so that we can look inside Palworld's container file. If you don't have FModel or haven't set it up yet, refer to the following: FModel Setup.
Once you have FModel up, open up Palworld's main container file. For Gamepass users, this should be called Pal-WinGDK.utoc. For Steam users, this should be called Pal-Windows.pak. Now that you're in, navigate to the file you want to edit or add to. If you know the file's name, use the search function found under the "Packages" toolbar option at the top of FModel for faster navigation.
For this example, we'll be modifying Lamball's drops. This can be found in the file DT_PalDropItem.uasset. After navigating to the file, double click to open it up and use Ctrl + F to bring up the search function, searching SheepBall (Lamball's internal name) to find Lamball's drop table. Now let's go back into Visual Studio Code and get to work!
Tip: Resizing Visual Studio Code and FModel to be side-by-side will help immensely, preventing you from having to go back and forth.
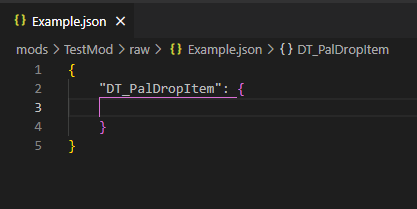
Back in Visual Studio Code, in the .json file, start by typing a { at the beginning of the file. This should automatically create a paired second bracket of the same type (this specific style of brackets are called as "braces"). Hit the "Enter" key to create a new line between the braces with automatic indentation.
In this new space, type in a single quotation mark. Just like with the braces (and other types of brackets), Visual Studio Code should automatically input the other for you, leaving your text cursor right in between them. It's in here that you'll put the name of the file. Keep in mind it should only be the file name and must not include the .uasset extension.
After that step is complete, typing another quotation mark will move your cursor past the already filled in one. Here, you'll need to put in a ":" (colon), a space after that, and then another brace and hit "Enter" one more time.
Things should now be looking like this:
Editing the File
Here comes the part we want FModel open for. In FModel, if you've successfully found Lamball's entry for drops, you should see this:
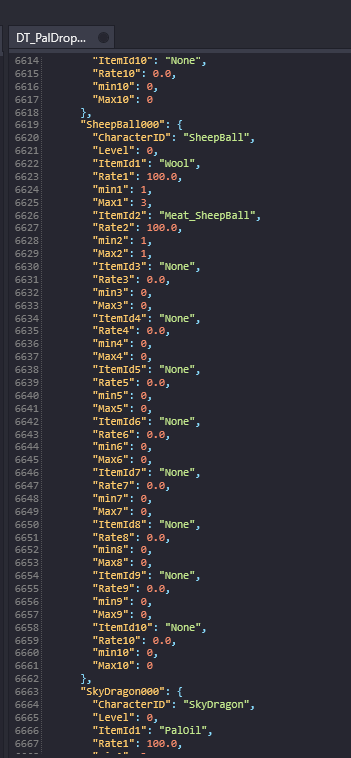
This is what a standard Datatable entry looks like, in this case specifically for Pal drops. This is also what we want to replicate in Visual Studio Code so that PalSchema knows what to alter. But since PalSchema alters only the lines specified, we don't need that whole thing.
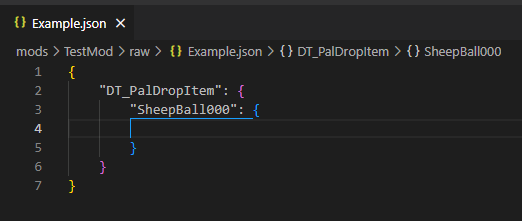
To start us off back where we left off in Visual Studio Code, we need the ID of the entry being altered first. Type it out just like you see presented in FModel. This is case-sensitive, so make sure everything matches properly.
Here, the entry ID will be "SheepBall000": {
Once typed in, hit "Enter" as per usual to create the next line. Your file should now be looking like this:
Under here is where we put in the lines we want to alter for any entry. For this example, we'll add an item to Lamball's drops: Horns. If you look in FModel, you can see all of the data for each drop. Since the line ItemId3 and it's companion lines contain nothing, we'll add it in here. You can, of course, choose any grouping you'd like, including overriding currently existing ones. This will also be the same method you use for any other standard DataTable changes.
In this specific instance, we need to edit the lines ItemId3, Rate3, min3, and Max3. To edit them, simply input them into your .json file under the SheepBall000 entry in the same way they show up in FModel.
Once finished, it should look something like this:
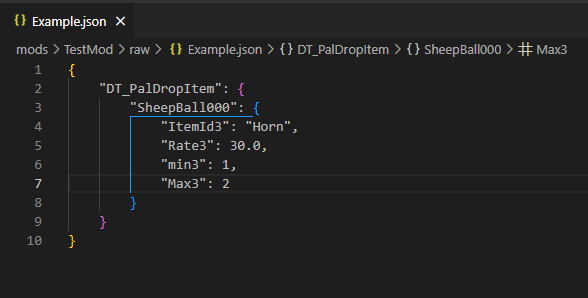
This tells PalSchema to alter the entry SheepBall000 within the file DT_PalDropItem, and that in the 3rd drop slot it should drop the Horn item (this is based on the item ID) at a rate of 30% of the time, dropping a minimum of 1 when they do drop, with a maximum possibility of 2 dropped at a time.
That's all that's needed! If you were to now save and launch the game, you should find that Lamballs will have horns as an item drop. You can now utilize this process for any DT file and entry as you please!
If you want to add new entries to a DT file, simply do the same process with a new/custom ID for the entry, and be sure to fill in all the necessary lines for the entry to be properly accepted.
In some cases, you may want to delete a row from a table. In that case, simply set the value of an existing row to null, and the entry will be deleted.
Note: There are some special entries such as Arrays, as mentioned at the start of this guide. Arrays are defined with standard or "square" brackets and may require more specialized modification.